GPS and sonar devices require a specific transducer to work correctly. Determine the type of assembly to be used, then select the sensor that is most suitable for the device, matching the frequency of the device to the frequency of the transducer. There are four types of standard transducer holders. The mounting screw through the hull and the mounting rods through the hull are the most complex and are usually the standard for the metal factory mounted on new boats. The drag motor assembly and the transom assembly are more common aftermarket facilities and moderately easy to achieve. You also need to have a reliable motor for your boat.
Instructions
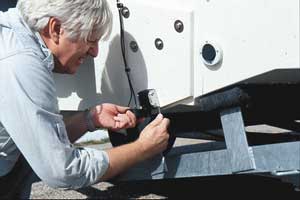
- Select the mounting location of the transducer on the transom.
- Align the ratchets on the transducer bracket. Slide the bolt through the bracket and the transducer.
- Mount the transducer bracket using the bolts, washers and nuts included with the transducer bracket. Tighten carefully.
- Align the transducer to the transom so that its face is parallel with the ground and its center line is even with the bottom of the hull. Frames through the bracket screw holes in the helmet using a black marker.
- Drill transom mounting holes according to the black marks using a # 29 drill bit.
- Place a small amount of marine sealant or adhesive in each of the mounting holes.
- Secure to the fixed transducer with two screws for # 10 stainless steel.
- Drill a hole in the hull above the waterline for the transducer cable using the 5/8-inch or 1-inch drill bit.
- Pass the transducer cable through the helmet. Completely seal the transfer with marine sealant or adhesive.
- Drill a hole for a half-way cable clamp between the transducer and the through-hole cable. Use drill No. 29.
- Place a small amount of marine sealant or adhesive on the mounting bracket in the hole.
- Secure the transducer cable in the plastic clamp. Attach the clamp to the helmet using a # 10 stainless steel wood screw.
- Connect the transducer cable to the GPS/Probe device.
- Test the unit according to the owner’s manual. Adjust accordingly. You also should know how to mount the transducer on a trolling motor if you have aq trolling motor in your boat.
Tips and warnings
- To work correctly, the Skimmer transducer must be in the water at all times and in a place that has a good flow of water when the boat is in motion. Do not mount the transducer less than about 1 foot to the lower unit of the motor. This will prevent cavitation interference from the propeller. Aluminium boats with fins or ribs on the hull can create large amounts of turbulence at higher speeds. A suitable transducer location on these types of vessel is between the nerves closest to the engine.
- If the transducer is not placed in a smooth flow of water, the interference caused by bubbles and turbulence can show on the screen in the form of random lines or dots. The unit could also lose background signal when the ship is on the plane. You can check the article what are the different types of transducers to know more.
- For single-frequency transducers, with a one-piece bracket, mounting it with the cable passes over the bolt and through the bracket.
- When mounting the transducer, make sure it does not interfere with the carrying of the boat.
- Do not over-tighten the transducer mount fixing nut. The transducer can not “start” if an object is hit in the water, which could damage the transducer.
- Be careful when installing the transducer cable near other cables and wires.
Comments are closed.